Installing XCP-ng on Scaleway Elastic Metal: 30 Hours of Pain, 10 Minutes of Script

Summary
Photo by Simon Infanger on Unsplash
Series: AI Agents on Self-Hosted Infrastructure
- Part 1: Your AI Agents Need Their Own Computers — Why self-hosted beats cloud for AI agent workloads
- Part 2: Installing XCP-ng on Scaleway Elastic Metal (you are here)
- Part 3: Three Agents, One Codebase, Zero Cloud Bills (coming soon)
TL;DR
Yes, you can install XCP-ng on a bare-metal cloud server. No, it’s not supported or recommended. What follows is a hobbyist’s battle with bare-metal provisioning, firmware ghosts, and networking layers that don’t exist yet. You might succeed in three commands. I certainly didn’t.
A quick disclaimer
Remember Part 1, where I casually promised you a breezy walkthrough? Rent a server, install a hypervisor, spin up some agent VMs, Bob’s your uncle. One paragraph, maybe two.
Yeah. Fate had other plans.
What you’re about to read is a sysadmin-wannabe war story. 30 hours across three separate server provisions, to be exact. If you came here for the AI agents, patience; they get their moment in Part 3. If you enjoy watching someone debug a 10-year-old firmware bug from a rescue mode SSH session at midnight, though? Pull up a chair. You’re going to love this.
A word about credentials: I’m not a sysadmin. I’m a hobbyist who’s been using cloud providers and hypervisors on and off, but this is far from my league. I had a mentor who helped me out of the trenches whenever I fell into one, but the general approach (how I organized the VMs, the XCP-ng install, the networking) is just me naively discovering the product with my existing habits. I’m almost sure there are better ways to do every single thing in this article. Half the time, my mentor wasn’t even solving the problem for me. I was rubber-ducking at them. Explaining what I expected versus what actually happened, out loud, step by step, was often enough to make the answer obvious. If you’ve never tried talking through a bug to someone (or some thing) that just listens and asks “what did you try next?”, I cannot recommend it enough.
The scripts I’ll share worked for me, but they are anything but robust. They work most of the time. Sometimes they don’t, and I have to add another guardrail because SSH timed out, a network interface wasn’t ready, or Scaleway returned something unexpected. There are dozens of edge cases I haven’t handled. Your mileage will vary. This is not a tutorial, not a how-to, not documentation. It’s a testimony of one person stumbling through an unsupported setup with the help of a patient mentor and a lot of stubbornness.
Who is this for? If you want the supported path, stop here and use the official XCP-ng installer on hardware you control. Seriously, do that. But if you want to see how to reason through an unsupported bare-metal install on a cloud provider that doesn’t officially support it, keep reading.
Why XCP-ng?
Fair question. Proxmox exists. KVM exists. Managed cloud exists. So why go looking for trouble?
First, context. After Broadcom bought VMware, the entire homelab and enterprise world started looking for alternatives. Most landed on Proxmox. And fair enough. I’ve run Proxmox in my own homelab, I’ve run ESXi back when I worked in fintech (the only way to get a Mac server in the server room), I even played with ESXPi on tiny ARM boards. But I kept hearing about XCP-ng and wondered: how different is it, really? Sometimes you have to try the road less traveled just to understand the map.
Second, XCP-ng runs on Xen, which provides hardware-level isolation, not process-level. For AI agents that execute arbitrary code, a hypervisor boundary is a different beast from containers. Containers share the host kernel. If an agent goes rogue inside a container, the escape path is real. Inside a VM, it’s not. Sleep better at night.
Third, honestly? I was curious. And stubborn. I do this a lot. I spend weeks on RISC-V projects just for the love of the platform, with zero expectation of ever getting a job in that space. XCP-ng was the same impulse: an interesting project, an open-source community, and a technology I wanted to understand from the inside. But being stubborn is not enough to solve a task like this. Fortunately, I had a good mentor for the journey, because I’m not skilled enough to have solved it all by myself.
“But why not just spin up EC2 instances?” Because you can’t learn infrastructure by clicking “Launch Instance.” Self-hosted means self-understood. Bare metal forces you to understand every layer: firmware, bootloaders, initramfs, networking. Managed cloud abstracts all of that away. There’s also the cost anxiety factor: a forgotten GPU instance on AWS can burn hundreds of euros overnight before you notice. A Scaleway bare metal at €0.77/hour with a manual teardown script gives you full control and a hard ceiling. And then there’s the sovereignty angle from Part 1. Your agents’ code, your data, your API keys: on someone else’s cloud, all of that transits their infrastructure. On your own hypervisor, at least the blast radius is yours.
The roadmap
Three checkpoints. Each one a small victory:
- Boot the installer somehow — When the hosting provider doesn’t offer your OS
- Make the first real boot succeed — When the hardware fights back
- Make it boring and repeatable — When “it works on my machine” isn’t good enough
Let’s go.
Checkpoint 1: Booting XCP-ng on Scaleway Elastic Metal
Before throwing money at cloud servers, we tested locally. VirtualBox, custom ISO, go. The good news: the XCP-ng installer booted, the TUI loaded, packages installed. The bad news: XCP-ng is a Type 1 hypervisor; it wants to own the hardware. Inside VirtualBox, it would install fine but crash in an ACPI reset loop about 80 seconds after boot. Every time. You can validate the installer in a VM, but you can’t run the result. Fair enough.
(This will become ironic in approximately three paragraphs.)
So, real hardware it is. Rent a bare-metal server on Scaleway for €0.77/hour, install XCP-ng, and done. Wait, what? Why not hardware from my homelab? I only have aarch64 and riscv64 available these days, and xcp-ng isn’t officially compatible with these architectures yet, so we’ll go to the cloud. Twenty minutes, tops.
The wall was immediate.
Scaleway’s Elastic Metal offers Ubuntu, Debian, CentOS, even Proxmox and ESXi in their OS list. But not XCP-ng. No virtual CD-ROM accessible via API. No way to override the BIOS boot order. The server boots from PXE (Scaleway’s provisioning), then from disk. That’s it. Those are your options.
(The irony that Scaleway supports Proxmox and ESXi, both hypervisors, both direct XCP-ng competitors, was not lost on me. But I digress.)
The kexec dead end
My first idea was kexec: a Linux system call that replaces the running kernel with a new one, bypassing the entire BIOS/bootloader chain. Install Ubuntu via Scaleway’s provisioning, SSH in, kexec into the XCP-ng installer kernel. Elegant on paper.
In practice? Not so much.
We tried three approaches. All three hit the same wall: Xen’s 32-bit multiboot ELF needs contiguous low memory that kexec can’t guarantee on a modern kernel. Even loading just the Linux kernel directly (skipping Xen entirely) resulted in a successful install, but with no network, because we hadn’t captured the real interface name and IP before blowing away Ubuntu. Oops. Lesson learned.
The pivot: Installing via QEMU with disk passthrough
So kexec was a dead end. Now what?
Scaleway has a rescue mode: boot Ubuntu into RAM, disks completely unmounted, SSH in as rescue. Every disk is a free target. Nobody’s using them. They’re just sitting there, waiting.
A word about those disks, and how we discovered them the hard way. Scaleway provisions this server with two 1TB SSDs in RAID1, a mirror. We didn’t know that at first. Our first QEMU attempt passed /dev/sda through to the installer while Ubuntu was still running on it. The XCP-ng installer started writing to the disk, SSH became unstable, the connection dropped, and the server rebooted on its own. We’d just corrupted the live root filesystem. Brilliant move, that. The RAID controller detected the damage and started resyncing. 930GB, about an hour of watching progress bars and questioning life choices.
That’s when we discovered rescue mode. In rescue mode, the disks are unmounted and the RAID isn’t assembled, so both sda and sdb are independent raw disks. Safe targets. We install XCP-ng to sda and leave sdb alone for now; it’ll become a local storage repository in Part 3 when we create the agent VMs.
The breakthrough was embarrassingly simple: install QEMU in rescue mode, boot the XCP-ng ISO inside a virtual machine, but point it at the real physical disks via raw device passthrough. A VM-within-a-VM, writing to real hardware. It sounds cursed. It worked.
“Wait,” you might say, “didn’t VirtualBox fail at exactly this?” Yes, but here’s the difference. We don’t need XCP-ng to run inside QEMU. We just need the installer to run long enough to write to disk. The installer is just a Linux program; it doesn’t need Xen. QEMU is our temporary construction scaffold, not the building.
sudo qemu-system-x86_64 -enable-kvm -m 24576 \
  -drive file=/dev/sda,format=raw,if=virtio,cache=none \
  -cdrom xcp-ng-8.3-unattended.iso -boot d \
  -netdev user,id=net0 -device virtio-net-pci,netdev=net0 \
  -vnc 127.0.0.1:0 -no-reboot -daemonize
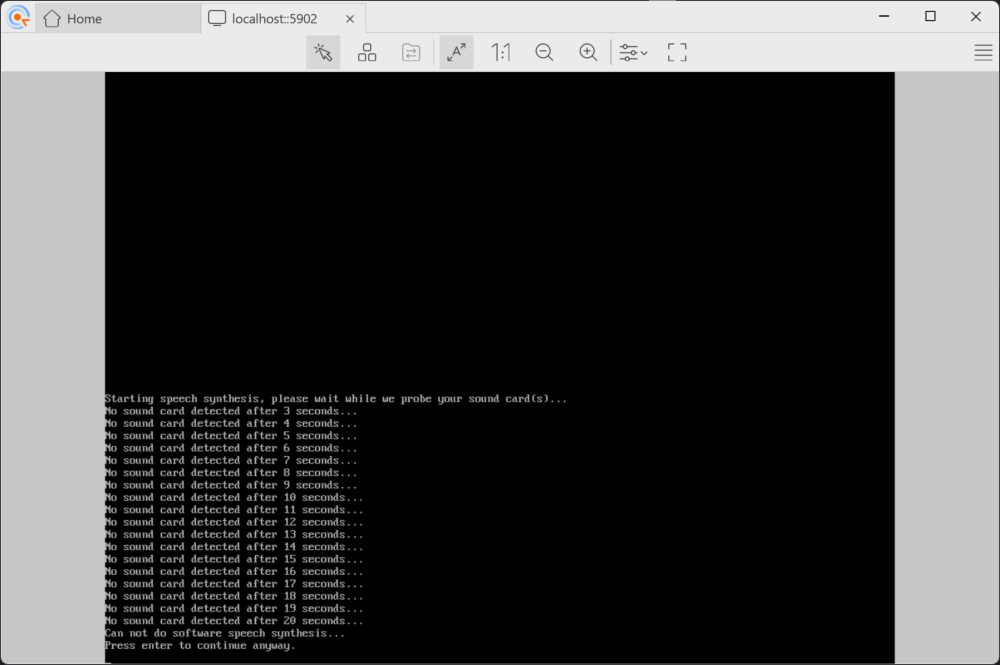
(Why VNC? Because when the installer hangs and you’re two SSH hops away from a headless server, you need some way to see what’s on screen. Is it a kernel panic? A dialog waiting for input? A progress bar at 47%? VNC on the QEMU instance is your only window into a process that otherwise runs blind. Bind it to localhost and use an SSH tunnel: ssh -L 5900:127.0.0.1:5900 user@host, then point your VNC client at localhost:5900. Never expose VNC on a public interface without authentication.)
See that -no-reboot flag? That cost us an entire provision attempt. Without it, the installer finishes, triggers a reboot, and the bare-metal server dutifully PXE-boots back into Scaleway’s provisioning, wiping everything we just installed. With -no-reboot, QEMU exits instead of rebooting. That’s our completion signal. No VNC babysitting required. You can go make coffee.
One trick worth explaining: XCP-ng’s netinstall ISO is only 164 MB, just a kernel and the installer. It expects to download the actual packages from a network repository. Why not boot the full 631 MB ISO directly? We could, but the netinstall approach gives us more control. There’s an answerfile, basically an XML file that pre-fills every installer question (“use this disk, this IP, this root password”), and it points at a specific HTTP URL for packages. Predictable. Debuggable. I like debuggable.
Why not just point the installer at XCP-ng’s public mirror? QEMU’s SLIRP networking does have internet access, but downloading 600+ MB over the wire would be slower, depends on mirror availability, and wastes bandwidth on a rented server. So the script downloads the full ISO once, extracts it, and serves it locally with python3 -m http.server 8099. Inside the QEMU VM, the installer reaches the host at http://10.0.2.2:8099/, QEMU’s SLIRP gateway, a virtual IP that routes back to the host process. Same packages, zero internet dependency during install.
The installer chugged through hundreds of HTTP requests, downloading every XCP-ng package from that local mirror. The VNC console showed “Installing XCP-ng… 31%…” and eventually “Completing installation.” The agents’ future home, built inside a VM-within-a-VM.
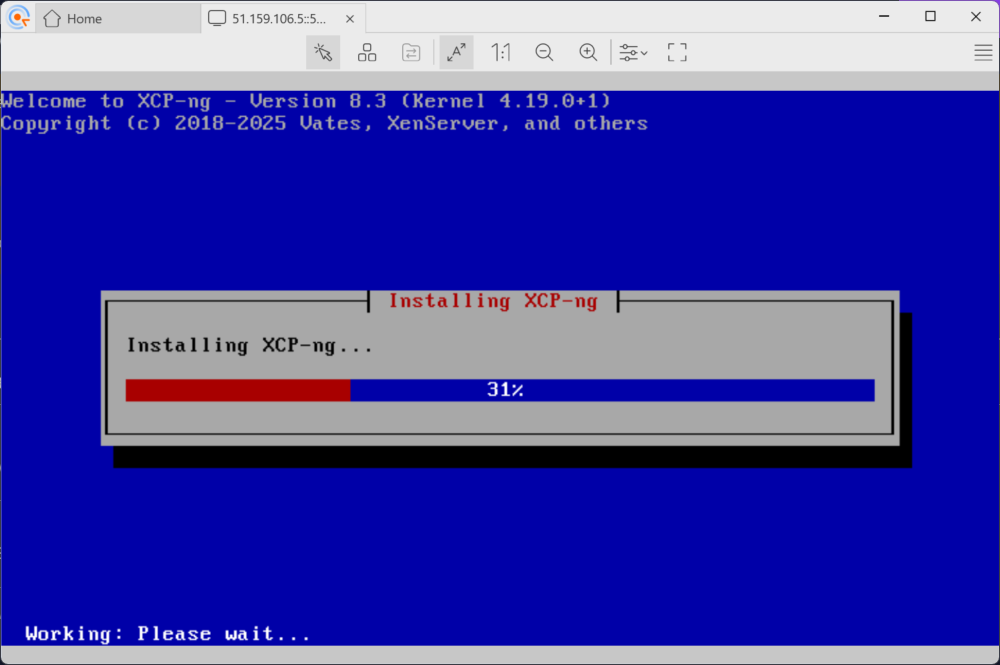
Mini-win: XCP-ng code running on hardware we rented 20 minutes ago.
Checkpoint 2: Make the first real boot succeed
Installation complete. Reboot the bare metal. Easy, right?
Not even close. Two villains were waiting in the shadows, and they’d been patient.
Villain 1: Missing AHCI drivers in the initramfs
First reboot. Xen started. The kernel loaded. Then:
VFS: Cannot open root device "sda1" or unknown-block(0,0): error -6
Kernel panic - not syncing: VFS: Unable to mount root fs

The line “available partitions:” was followed by… nothing. Absolutely nothing. The kernel couldn’t see any block devices at all. It was like trying to find your car in a parking lot that doesn’t exist.
Here’s what happened: the XCP-ng installer ran inside QEMU with virtio disk emulation. Virtio is the paravirtualized driver standard for VMs, where the guest OS knows it’s virtualized and uses optimized fake hardware instead of emulating real hardware. So the installer packed virtio drivers into the initramfs. Makes perfect sense from its perspective: “I see virtual disks, I’ll remember how to talk to virtual disks.” But on the real Dell PowerEdge R220, the disks are SATA. They need ahci and libahci drivers, which weren’t included. The initramfs was looking for disks using the wrong glasses.
The fix involves dracut, XCP-ng’s initramfs generator. Dracut inside a rescue chroot can’t auto-detect hardware, so you must explicitly list which drivers to include. The obvious approach, dracut --add-drivers on the command line, silently drops drivers it deems unnecessary in a chroot. The approach that actually works: a config file.
cat > /mnt/etc/dracut.conf.d/bare-metal-drivers.conf << 'EOF'
add_drivers+=" ahci libahci libata sd_mod ata_piix ata_generic tg3 igb e1000e "
EOF
chroot /mnt dracut --force /boot/initramfs-4.19.0+1.img 4.19.0+1
Replace 4.19.0+1 with your actual kernel version – run ls /mnt/boot/initramfs-* to find it.
Not the most glamorous fix. But without it, your hypervisor can’t find its own disks. Kind of a dealbreaker.
Tip: Scaleway’s hardware lottery means you might get Intel NICs (igb, e1000e) or Broadcom (tg3). We include both driver families in the dracut command to handle whatever shows up. Run ethtool -i eno1 before the install to check what you got.
Villain 2: Dell DellPartition.efi crashes on GPT
Initramfs rebuilt. Reboot again. And then the server refused to boot. At all.
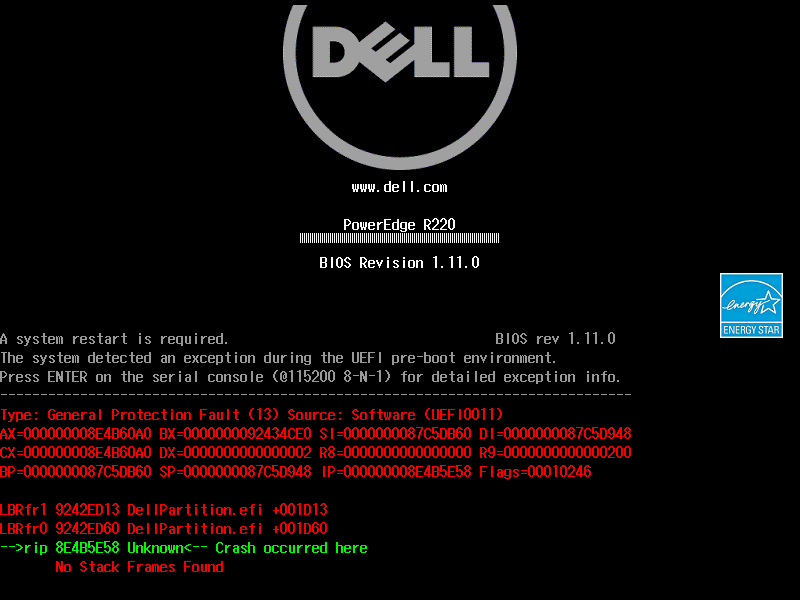
Green and red register dumps. General Protection Fault (13). DellPartition.efi. Crash occurred here. No Stack Frames Found. And at the top, the cheerful message: “A system restart is required.”
I genuinely thought I had bricked a rented server. That’s not a great feeling when you’re paying by the hour and the machine won’t even POST. My heart rate was… elevated.
After several reboots that all ended the same way (sometimes this crash screen, sometimes just a black screen with a blinking cursor), I started digging into what DellPartition.efi even was.
The root cause? Oh, you’ll love this.
The XCP-ng installer creates GPT partition tables by default. GPT – GUID Partition Table, not the chatbot, though both have caused me headaches. This Dell PowerEdge R220, however, runs Legacy BIOS (confirmed via iDRAC: BootMode=Bios). Dell’s firmware includes a component called DellPartition.efi that scans partition tables during POST. On Legacy BIOS mode, it crashes with a General Protection Fault when it encounters GPT. The crash happens before GRUB even loads. Sometimes you get the crash screen above. Sometimes you get nothing. Just a blinking cursor in the void.
Let that sink in. A 10-year-old firmware component crashing on a perfectly standard partition table. Debugging it from a rescue mode SSH session at midnight, with no error message to work from, was exactly as fun as it sounds.
The fix: convert GPT back to the older MBR format. We lose the modern niceties, but at least the firmware stops crashing.
sgdisk --gpttombr=5:1:6:3 /dev/sda
chroot /mnt grub-install --target=i386-pc /dev/sda
That sgdisk command converts four GPT partitions into MBR slots. The 5:1:6:3 maps GPT partition numbers to MBR positions. These are specific to this install; run sgdisk -p /dev/sda to see yours. MBR only supports four primary partitions, so you pick the ones that matter (root, logs, swap, storage) and let the rest go. Safe here because the disk is under 2TB and everything uses filesystem labels, not partition UUIDs.
Two commands. Hours of head-scratching. Classic.
The triumph
Third reboot. GRUB menu appeared. Eleven Xen and Linux entries, proof that our MBR conversion and GRUB reinstall actually worked.
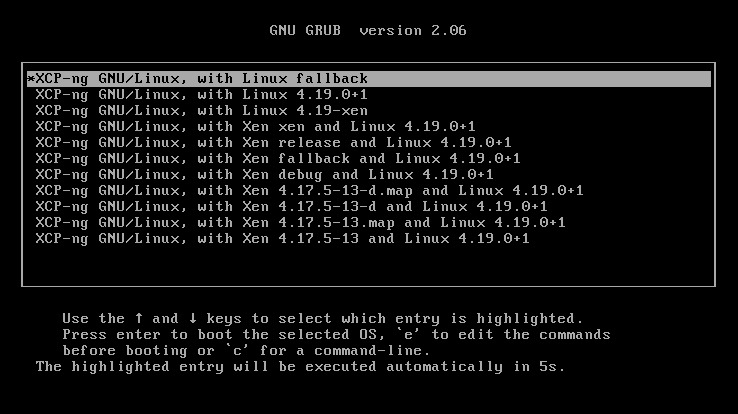
Five-second timeout. Black screen again — my heart sank — and then a wall of green [ OK ] lines scrolled past. OpenSSH. XAPI certificates. Storage Manager. Open vSwitch. Every service XCP-ng needs to be a hypervisor, booting on real hardware.
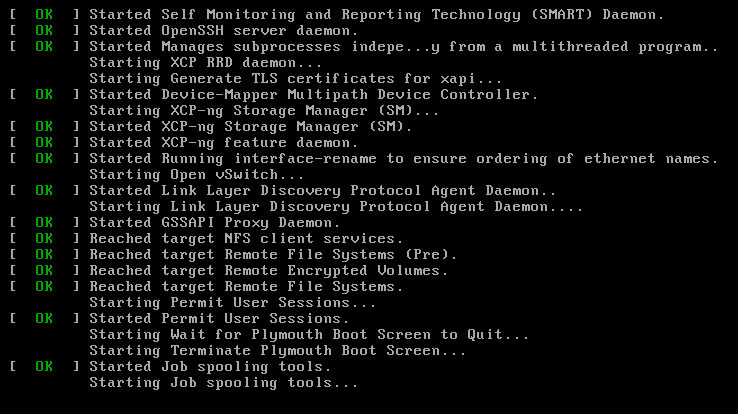
And then the xsconsole loaded. XCP-ng’s management interface. On the screen:
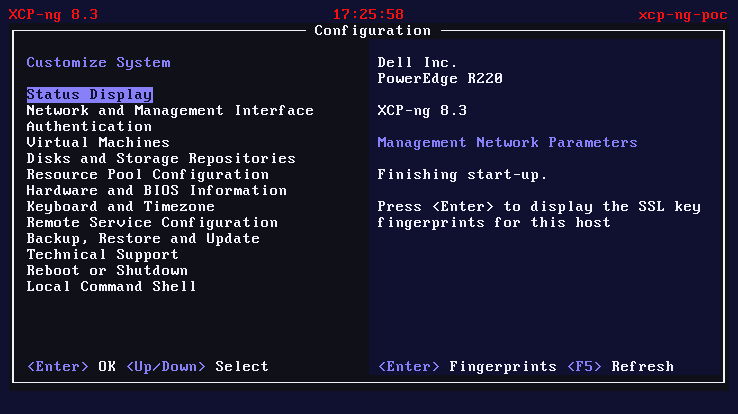
Dell Inc. PowerEdge R220
XCP-ng 8.3
“Finishing start-up.”
I may have made an undignified sound. The neighbors probably heard.
Checkpoint 3: Make it boring and repeatable
XCP-ng was running. But “running” and “usable” are different things. No network meant no SSH, no Xen Orchestra, no VMs. A hypervisor with no network is basically an expensive space heater.
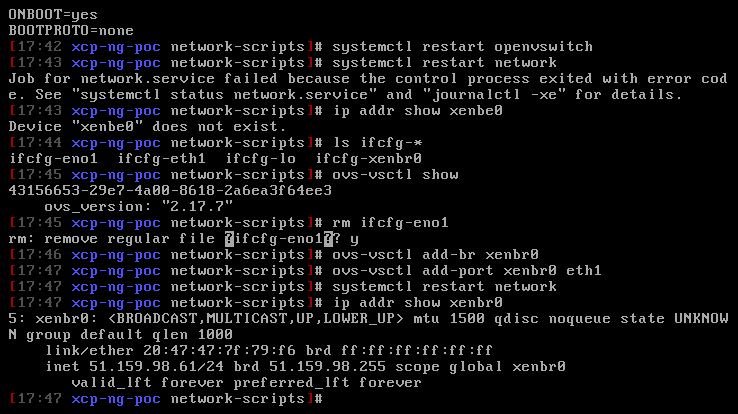
Fixing Open vSwitch networking after the QEMU install
Two problems, both leftovers from the QEMU install. Because of course they were.
First, /etc/firstboot.d/data/management.conf, XAPI’s first-boot configuration, still had QEMU’s values: interface eth0, protocol dhcp, DNS 10.0.2.3. All perfectly correct inside QEMU’s SLIRP network, all catastrophically wrong on bare metal where the real NIC is eno1 with a static IP.
Second, and this was the sneaky one: XCP-ng uses Open vSwitch (OVS) instead of standard Linux bridges for its virtual networking. Think of a Linux bridge as a simple network switch connecting VMs to the physical NIC. OVS is the enterprise version: programmable, VLAN-aware, flow-based. Different beast, different config syntax. Our network config files used TYPE=Bridge, standard Linux syntax, completely ignored by OVS. The correct format is TYPE=OVSBridge with DEVICETYPE=ovs. Two config lines. Finding those two lines took 4 hours.
Four. Hours. For two lines.
(If that doesn’t capture the essence of debugging network configuration, I don’t know what does.)
Note: XAPI may overwrite flat-file network config on first boot. If networking resets after reboot, use
xe pif-listandxe pif-reconfigure-ipto set the permanent configuration. The flat files are just the bootstrap; XAPI owns the state after that.
Third, and this one bit us on the automated run: XCP-ng’s interface-rename service maps NICs to ethN names by MAC address on first boot, overriding the predictable naming you see in rescue mode. In rescue mode, the Broadcom NIC was called eno1. Our script wrote the OVS config for eno1. But interface-rename assigned the real NIC to eth1. The QEMU install had left a stale PIF entry for the virtual NIC (52:54:00:12:34:56), which claimed eth0. The config file referenced an interface that didn’t exist. OVS never created the bridge. No bridge, no IP, no SSH. The fix was purging the QEMU PIF entry and renaming the config files to match the actual interface assignment.
And then, the fourth trick. Everything looked perfect: xsconsole was up, SSH worked, networking was fine, XAPI was running. We created three VMs. Tried to start one. “HVM not supported.” On a server with VT-x? Impossible. Except: cat /proc/cmdline showed BOOT_IMAGE=/boot/vmlinuz-fallback. The server had booted a plain Linux kernel, not Xen. XAPI was running but there was no hypervisor underneath. Like having a car dashboard but no engine. The cause: grub-mkconfig puts Linux fallback entries before Xen entries in the menu, and the default was entry 0. Fix: grub2-set-default to the first Xen entry, reboot.
Four bugs. Four different layers (XAPI config, OVS syntax, interface naming, GRUB boot order). Each one invisible until the previous one was fixed. I’m told this is normal.
The script
Everything above (the QEMU install, the initramfs rebuild, the GPT-to-MBR conversion, the OVS networking fixup, the management.conf rewrite) is now automated in install-via-qemu.sh. Next time, this is a three-command process:
# 1. Upload the script to your Scaleway rescue session
scp install-via-qemu.sh rescue@<ip>:~/

# 2. Run it
sudo bash install-via-qemu.sh \
  --target /dev/sda --ip <SERVER_PUBLIC_IP> --gateway <SERVER_GATEWAY>

# 3. Reboot to normal mode
That dream? It’s done. provision-scaleway.sh --full does the whole thing: creates the server, waits for delivery, switches to rescue mode, uploads the install script, runs it, reboots to normal mode, and validates SSH connectivity. One command, walk away, come back to a running hypervisor.
Here’s what a clean run actually looks like (measured on fr-par-2, Dell PowerEdge R220, March 2026):
| Phase | Time |
|---|---|
| Install dependencies (rescue) | 0m 17s |
| Disk wipe | 0m 01s |
| ISO build (custom XCP-ng netinstall) | 1m 11s |
| HTTP repo setup | 0m 03s |
| QEMU install (KVM-accelerated) | 5m 30s |
| Chroot fixes (initramfs, GRUB, networking) | 0m 42s |
| Reboot + XAPI first-boot validation | 2m 00s |
| Total: rescue shell to SSH-ready XCP-ng host | 9m 44s |
Under ten minutes from rescue shell to running hypervisor. Add server creation and delivery time (varies by zone; fr-par-1 is noticeably faster than fr-par-2), and you’re looking at roughly fifteen minutes end-to-end. No VNC. No keyboard. No browser. Compare that with the 30 hours it took to figure out what to automate.
Jon Masters had it right back in 2016 when he was pushing ARM servers at Red Hat: they’d only win by becoming “boring”. As predictable as x86. Same thing here. To be clear: XCP-ng itself installs fine on most hardware. Boot the ISO, answer a few questions, done. The 30 hours and 13 discoveries were almost entirely caused by Scaleway’s locked-down boot process, which doesn’t let you mount your own ISO or control the boot order. On a server where you can plug in a USB stick or set a virtual CD in the BMC, this is a 20-minute job. The script is my small contribution to making the hard path boring too.
We now have a running hypervisor. Time to put it to work.
The VMs
With a repeatable install pipeline in hand, it was time to actually use this hypervisor. The plan: three agent VMs with this resource split:
| VM | RAM | vCPUs | Disk | Role |
|---|---|---|---|---|
| agent-claude | 8 GB | 4 | 40 GB | Claude Code agent |
| agent-gemini | 8 GB | 4 | 40 GB | Gemini CLI agent |
| orchestrator | 2 GB | 2 | 20 GB | Task coordinator |
Total: 18 GB of 32 GB allocated, 100 GB of 953 GB storage (on sda; sdb becomes an LVM storage repository for VM disks). Room to breathe.
But you don’t want to manually install Debian three times, configure the same packages three times, set up the same SSH keys three times. That’s where golden templates come in.
The idea: install the OS once, configure everything exactly how you want it (packages, users, SSH keys, development tools, the works), then convert that VM into a template. xe vm-copy creates a full, independent copy of the disk. Takes a couple of minutes per VM, but the result is completely standalone, no shared backing store. It’s the VM equivalent of a Docker image, except it’s a full machine with its own kernel, init system, and network stack.
For our agent fleet, the golden template will have: Debian Bookworm 12, git, Python 3, Node 22, and the AI CLI tools. We originally tried Debian 13 (Trixie), but the Trixie installer would hang at 0% CPU during “Configuring apt,” the preseed support isn’t as battle-tested as Bookworm’s yet, and debugging a frozen installer over VNC through a hypervisor is nobody’s idea of fun. Bookworm 12 installed on the first try. The Bookworm template in XCP-ng 8.3 sets sensible HVM defaults. We downloaded the netinst ISO directly to the host and attached it to the first VM, our future golden template.
Naturally, the template had one more surprise. XCP-ng’s Debian Bookworm template sets eliloader as the PV bootloader, a paravirtualized shortcut that extracts kernels directly from ISOs for supported distros, bypassing GRUB entirely. Great when it works. When it can’t recognize the ISO (as happened with our custom preseed ISO), it fails silently, and the VM falls through to the UEFI firmware.
Start the VM expecting a Debian installer. Get a UEFI Interactive Shell instead: Shell> _, blinking cursor, no OS in sight.

The fix: five xe vm-param-set commands to basically say “stop being clever, just boot from the CD like a normal computer.” Clear the PV bootloader, switch to BIOS firmware with CD-first boot order, change the device model from qemu-upstream-uefi to qemu-upstream-compat.
With the installer running, we baked a Debian preseed file into a remastered ISO for fully unattended installation, no keyboard interaction needed. One last gotcha: the VMs need internet access for package installation. My first instinct was to borrow adjacent public IPs from Scaleway’s shared /24 L2 segment – pure L2 forwarding through the OVS bridge, no NAT. It worked, but it’s undocumented, brittle, and could conflict with other customers on the same segment. Not something you’d want in a script.
The cleaner approach: put VMs on a private subnet (10.0.0.0/24), use dom0 as a gateway with iptables MASQUERADE. But here’s the catch with XCP-ng’s Open vSwitch networking. When VMs sit on the same bridge as the public interface, traffic is bridged (Layer 2) and bypasses iptables entirely. The br_netfilter module isn’t loaded, so netfilter never sees the frames. The MASQUERADE rule exists but never fires. The trick is to put VMs on a separate internal network with dom0 as their IP gateway. That way traffic is routed (Layer 3) through dom0’s network stack, where iptables works normally. Different topology, same MASQUERADE rule, completely different result.
Oh, and Debian now defaults to PermitRootLogin prohibit-password in sshd. A one-liner in the preseed’s late_command takes care of that, but only after you discover it by staring at “Permission denied” for five minutes wondering what you did wrong.
Creating a golden VM template
Once the first Debian VM was installed and SSH-accessible, we exported it as an XVA, XCP-ng’s portable VM format. That ~860 MB file is hardware-independent: it runs on any XCP-ng host regardless of whether the physical server is a Dell, HPE, or Supermicro. Import it with xe vm-import and you skip the entire preseed dance.
Three xe vm-copy commands later, we had our fleet:
| VM | RAM | vCPUs | IP | Role |
|---|---|---|---|---|
| agent-claude | 8 GB | 4 | 10.0.0.101 | Runs Claude Code |
| agent-gemini | 8 GB | 4 | 10.0.0.102 | Runs Gemini CLI |
| orchestrator | 2 GB | 2 | 10.0.0.103 | Coordinates tasks |
18 GB of RAM allocated, leaving ~14 GB for dom0. The VMs live on a private 10.0.0.0/24 network with dom0 as the gateway. Dom0 gets 10.0.0.1 on the internal bridge, enables ip_forward, and adds a single MASQUERADE rule so VMs can reach the internet through the server’s public IP. No Flexible IPs, no Scaleway-specific networking. Just standard Linux routing that works on any XCP-ng host.1
Three gotchas emerged, all silent, all requiring their own debugging cycle.
XCP-ng has this firewall chain called RH-Firewall-1-INPUT (yes, Red Hat heritage, alive and kicking). It ends with REJECT all, and the FORWARD chain jumps to it early. Our NAT forwarding rules, appended with iptables -A, landed after the jump. Every forwarded packet, quietly rejected. We had NAT. We had a gateway. We had absolutely nothing working. Took way too long to spot that one. Fix: iptables -I FORWARD 1 (insert at position 1, before the firewall jump).
Then there’s XAPI’s habit of resetting the internal bridge whenever a VM starts. You carefully set up 10.0.0.1 on the bridge, start a VM, and… the IP is gone. The Debian preseed installer can’t reach any mirror. A sleep 3 and re-check after every xe vm-start is a band-aid. The real fix is writing an ifcfg-<bridge> file in /etc/sysconfig/network-scripts/ so the IP persists across bridge resets.
And SSH. XCP-ng doesn’t ship sshpass, and the golden template’s only credential is the root password set by preseed. Key-based auth is the only option, but the key doesn’t exist yet when the VM first boots. So after the preseed install completes and the VM halts, we mount the virtual disk from dom0 (kpartx + mount), inject dom0’s SSH public key into /root/.ssh/authorized_keys, unmount, then boot. Five extra lines that unlock the entire provisioning pipeline.
One more catch: every clone boots with the golden template’s IP. Three VMs, same address, instant network chaos. Same trick: before starting a clone, mount its disk from dom0 (kpartx + mount; XCP-ng’s LVM-backed storage uses /dev/sm/backend/ paths that don’t create partition nodes automatically), edit /etc/network/interfaces to set a unique IP, update the hostname, inject dom0’s SSH key, unmount. Five minutes of scripting per VM. For three VMs this works fine. If I ever need ten, I’ll probably look into cloud-init and xenstore – which is apparently what Xen Orchestra does under the hood.
Provisioning the agents
Before cloning, we installed everything into the golden template itself: Node.js 22 (via NodeSource), Python 3, git, build tools, and the AI CLIs. That way every clone comes ready to work.
# Inside the golden template (before cloning):
apt-get install -y git python3 nodejs jq build-essential
npm install -g @anthropic-ai/claude-code   # Claude Code 2.1
npm install -g @google/gemini-cli           # Gemini CLI 0.31
One gotcha: the Debian installer’s preseed had quietly written a proxy configuration to /etc/apt/apt.conf, pointing at a proxy server that no longer existed. apt-get update would hang for thirty seconds per repo, then fail. A quick rm /etc/apt/apt.conf fixed it. We added it to the preseed’s late_command so future golden templates come clean.
After cloning, the VMs had all the tools already. No per-VM installation needed.
The final fleet, SSH-accessible from dom0 and ready for work:
[root@xcp-ng ~]$ ssh root@10.0.0.101 "hostname; claude --version"
agent-claude
2.1.63 (Claude Code)

[root@xcp-ng ~]$ ssh root@10.0.0.102 "hostname; gemini --version"
agent-gemini
0.31.0

[root@xcp-ng ~]$ ssh root@10.0.0.103 "hostname; claude --version"
orchestrator
2.1.63 (Claude Code)
All four VM images (golden template plus three agents) are sitting in a Scaleway Object Storage bucket as XVA exports, about 1.4 GB each. The XCP-ng host disk image is there too. Next time, we skip the 30-hour adventure: spin up a fresh Elastic Metal server, restore from S3, and be running in minutes instead of hours.
Wall-clock times
From a cold start (no cached ISOs, no pre-existing storage), setup-vms.sh provisions the full VM fleet in under twelve minutes:
| Step | Time |
|---|---|
| Fix SSH access (Scaleway .bashrc trap) | 0m 03s |
| Verify XCP-ng host | < 1s |
| Create LVM storage on /dev/sdb | 0m 02s |
| Create internal VM network + NAT | 0m 01s |
| Download Debian netinstall ISO | 0m 10s |
| Build preseed ISO | 0m 07s |
| Create ISO storage repository | 0m 02s |
| Debian install (automated preseed) | 3m 47s |
| SSH key injection (mount disk from dom0) | 0m 04s |
| Provision tools (Node 22, Python 3, AI CLIs) | 4m 50s |
| Clone 3 agent VMs (disk copy + IP assignment) | 2m 16s |
| Start VMs + verify SSH | 0m 30s |
| Total: bare XCP-ng host to 3 running agent VMs | 11m 52s |
Combined with the XCP-ng install (9m 44s), the full pipeline, from API call to three SSH-ready agent VMs, takes about 22 minutes. Most of the time is spent waiting for apt to download packages and LVM to copy 40 GB disk images. The scripting itself takes almost no time.
The tally
~€5 in server rental. 30 hours across 3 provisions. 47 moments of doubt. One undignified sound.
The 30 hours break down roughly as: 10 hours on the kexec dead end, 8 hours on firmware and initramfs debugging, 6 hours on networking archaeology, and 6 hours on VM provisioning and golden template creation. This is an unsupported platform on a hardware-lottery provider (same offer, you might get a Dell or an HPE, surprise!), and I’m a hobbyist with a mentor, not an expert. On supported hardware, the official installer takes 20 minutes. On a server where you control the boot order? Even faster.
Dear Scaleway
Three product gaps caused 80% of the pain:
- No custom ISO boot — Adding XCP-ng to the OS list (like you already did for Proxmox and ESXi) would eliminate the QEMU workaround entirely.
- No boot order API — Letting customers override the BIOS boot sequence programmatically would make this a 20-minute job.
- The LVM warning — Your own docs say “LVM should not be used due to functionality issues” on Elastic Metal custom partitioning. XCP-ng uses LVM as its default storage backend for VM disks, and so does Proxmox. If there’s a known issue between your hardware provisioning and LVM, hypervisor users really need to know about it.
Fix those and this becomes boring. Make it boring.
Someone already opened a feature request for XCP-ng support on Elastic Metal. I upvoted, with a screenshot attached to prove it works. If you’d rather not repeat my 30-hour adventure, maybe give it a vote too.
What’s next
The infrastructure is ready. The agents get to work.
In Part 3, three AI coding agents, each running in its own isolated XCP-ng VM, tackle a real development task in parallel. An orchestrator coordinates. PRs get created. Some things work. Some things don’t. And the thesis from Part 1 either holds up or it doesn’t.
This article documents a hobbyist’s experience. Your hardware, firmware, and hosting provider will vary. The working scripts are on GitHub if you want to try it yourself. Issues and PRs welcome. Follow me on dev.to if you want to catch Part 3 when it drops.
-
If you need inbound connectivity (say, a Jenkins controller reachable from GitHub webhooks), Scaleway offers Flexible IPs with virtual MAC addresses. Each VM gets its own public IP and Scaleway routes traffic directly to it. For short-lived agent VMs that only need outbound internet access, NAT is simpler and cheaper. ↩